Showing posts with label Craft Club Challenge. Show all posts

Monday, 28 July 2014

Craft Challenge w/c 28th July 2014

This is our last session before my summer break and so we will doing a catch up session from the last few weeks, I will be demoing the lovely flourish stamps that came into our in-house library last week and we will be getting the dies back out for you to make the most of....These include the T-cup die (a special appearance) the mini cake stand, the flourish thick die which I don't think was actually used last week and this is great to die cut chip/mount board.

We now have so many lovely new grey rubber stamps it will be great to play and get some bits stamped out for you to use whilst we are off.

So, bring with you, plenty of card stock for die cutting or stamping, and if you want to have a go at lots of heat embossing remember to bring your powders.  If you have anything you have bought and want more ideas bring it along and hopefully I can give you some ideas.

The Pine cone die is now in the kit for you to use plus the oriental arch and mirror frame, Yippee!!!! these are really lovely dies...and the pine cone dies look great when they are cut from taupe colour card.  I will pop a pic on here of the dies soon.

Just to remind you I will be off for all of August and we start again in September with loads of new ideas and lots of new  grey rubber stamps.

Monday, 21 July 2014

Craft Club Challenge-w/c 21st July 2014

Mini Cupcake Stand

There is always an occasion where these little cake stands are a great addition to the decorations, be it Christmas ornaments, party favors holding chocolates (great for weddings), individual stands for a scrummy cupcake, and as you can see below just a lovely stand to display home decor, once you have made one you'll be hooked!
They look lovely in pretty papers or great in simple card stock....the heavier the item to display the thicker the card stock should be and the more base stands required.


As you can see below in the photo below ...this shows a large black dome....this is in fact a piece of scrunched kitchen foil made in that shape then painted with black acrylic paint and this is now ready to take 3D decorations such as flowers, pre-brought or hand crafted (paper or fabric), sweets, altered art style of paper decorations such as masks, crowns, wings, cogs, tickets etc.  This cone enables decoration visible from all side and the best glue to attach your decorations is Pinflair Gel glue/silicone, or a hot/cold melt glue gun.
I hope you have as much fun with these as I have had.  I will be demoing how to make the stand and will leave the decoration up to you.  To get the most out of the session you may like to plan ahead and create at home some 3D flower decorations/ leaves/altered art pieces etc ...there is no rush you can simply create the stand and take them home to finish off.

You will need:

  • Good wight decorative papers (they should be lightweight card really) you will also need good weight card stock to strengthen your piece.
  • Tacky PVA glue....cheaper PVA glue is harder to use as it has more water content and in recent weeks I have used a lot of mine to compensate for cheaper glues or if people forget so please make a short note to bring it with you.
  • Ribbons (thin ribbons work better around the base), gems and pearls, flowers, fine border peel-offs, mini bows,
  • You may want to do some stamping/embossing its up to you.
  • You may also like to bring your border dies if you have them....thin ones work well or what ever you have.
.....and that's it... go vintage, altered art, matching your decor at home, funky, Christmas or Halloween, wedding, kids party.  These also make a great stand for a birdcage (use our dies and make them fit!)

Go that step further and create a glass effect dome to go over the top...use the top of a clear plastic drinks bottle or use outdoor plastic party glasses, make sure they are a good dome shape, snip the stem off and add an accent on the top to cover where the stem was removed.

I will be adding in more grey rubber stamps to our stash for you to use each week...Just a little reminder...one of the stamps was left out on the table on an acrylic block and the box was on the shelf.  Please ensure all the stamps you use are washed well (so bring your Alcohol free baby wipes) and dried and put back in the appropriate box (keep the box out till you have finished with the stamp) These stamps will be easily lost as some are small and they are loose. 

The grey rubber stamps for this week are a huge selection of flourish stamps.... will post the contact sheet here shortly.

Looking forward to a great week and for those who are a Pinnacles club member don't forget their discount weekend starts this Friday and ends Sunday.

Monday, 14 July 2014

Craft Club Challenge- w/c 14th July 2014

Hi all, hope you had a great weekend....a bit soggy, I know....at least the sun is shinning today and the weather is set to get warmer as the week goes on!  Hot, hot, hot!

Here is this weeks Craft Club Challenge:

Feathers, Masks and Crowns

Here are the new grey rubber stamps going in to our craft equipment kit from now on and I will be using them on this weeks demo:

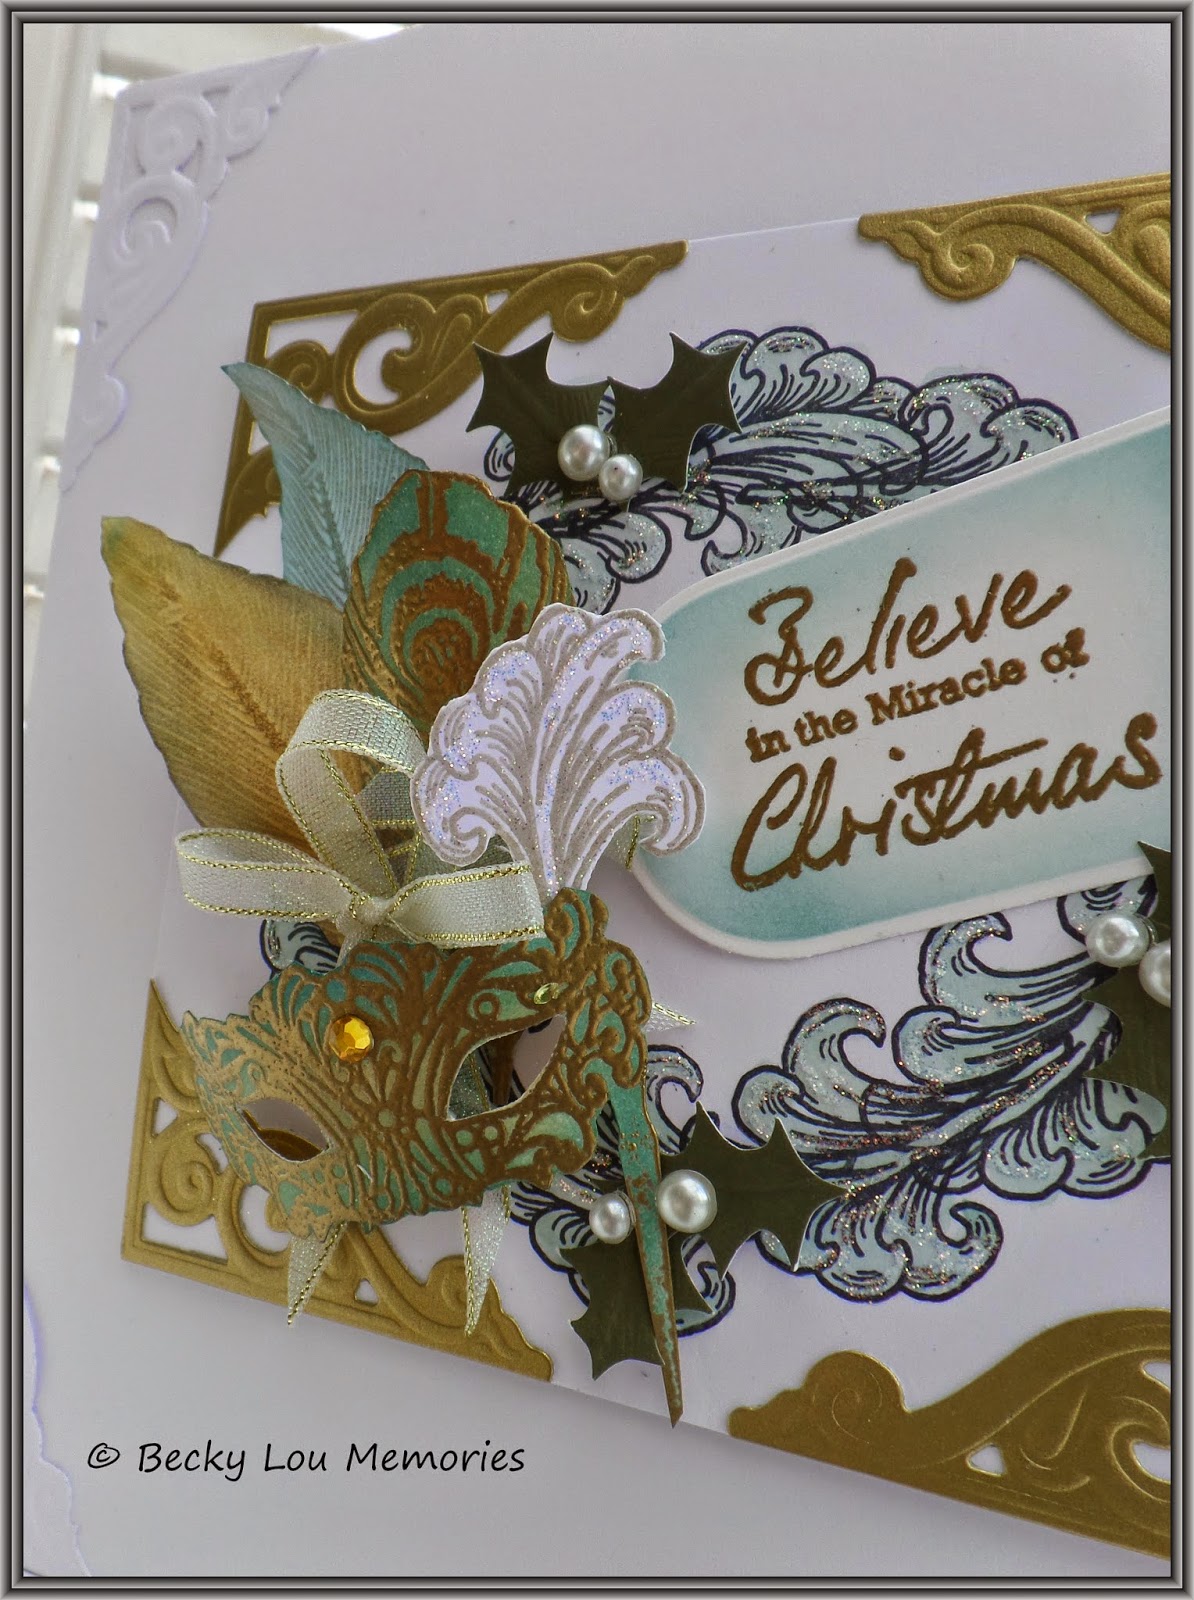
...and as you know, I am leaning toward the Christmas theme (but I know some of you are horrified of even thinking Christmas at the moment) and so here is my sample for this week:
(Click once on the Photo to enlarge)

as you can see I have used the mask for a Christmas theme....there are still a few extra snow flakes to go on ....but this is such a great set of stamps to use in any which way you want....more ideas will follow as the week goes on so keep an eye on here for more photos.  I have also dipped into our x 82 new wording/phrase stamps and used the "Believe in the Miracle of Christmas" stamp.

If you want to have a go at the Demo card you will need:
  • your base greeting card
  • plain white or cream and also contrasting card if you want to add additional layers.
  • I have the peacock embossing folder here for you to use this week.
  • You may also like to bring....pigment inks for embossing with powders or colouring  the card as I have done with the mask...embossing powders, chalks such as Pan Pastels, Mica powders, guilding foil flakes, metalic/pearl paints...glue pens and glitter, glitter glues such as stickles.
  • for those who have the Utee embossing powders you may like to experiment with the masks and emboss into glazed mount board tiles so bring your Utee and Mount board.
  • Gems and ribbons
This is a lovely set of stamps for going to town with the glitz and sparkles!  I have used a pine cone die which I borrowed from Jan on Friday and this will not be available  but there is plenty to choose from to make a corner decoration.

Here is another card just finished today ...Tuesday:


Have a great week.


Monday, 7 July 2014

Craft Club Challenge - w/c 7th July 2014

This week is a catch up week, so bring along any cards you are yet to finish....and I challenge you to finish them!  It's hard I know... and yes I have many unfinished cards but I am determined to get them done.  If you missed any of the demos and want to try one let me know....and I will get you started and don't forget all the stamps, dies and equipment we have used over the last 3 weeks are available to use.

More stamps going into the kit this week and a photo of last weeks Christmas grey rubber stamps and the letter dies plus a See Dee foam mat for rubber stamping:


 Reindeer is upside down...ooops!...but you get the gist....these contact sheets appear roughly stamped and that is because I have stamped these out using Distress Inks and being water based they are easier to clean!  I have also left a bit more room on the contact sheet as I may be adding more in the future.  These grey rubber stamps are in addition to hundreds of other stamps already available for you to use each and especially a christmas drawer of stamps and punches .


We now have a few additional spaces in the club and I will be advertising soon, which fortunately I haven't had to do for some years so if you know anyone who fancies the Craft Club (various days) or Sewing club on a Thursday afternoon get them to call me asap (10702) 206910 as the places will go pretty quickly once the advertising goes out.

Have a lovely week and see you soon.

Monday, 30 June 2014

Craft Club Challenge w/c 30th June 2014

Christmas Ideas

It really wont be long ....and Christmas will be upon us!!  Scary Eh! So I thought we could start our Christmas cards now if you fancy getting organised.

As previously advised our fees are going up slightly and the revised Terms and Condition sheets will be given to you to sign tomorrow.  As you know I always try to give you that little bit extra and so by way of a "Thank you" for your continued support we have a new selection of grey rubber stamps in our stash ...starting with x 82 wording stamps for all ocassions and this is the start of a gradual introduction of a further x 100+  stamps with a huge variety of themes of which I will be incorporating into my demos.

For this week we will be playing with the Christmas selection and a particular style of card which is that bit different...the Wallet card.

For this project you will need to bring:

  • Plain good weight card stock to make the wallet and insert. It can be the same colour or contrasting.
  • We will be scoring using the Hougie Board so if you have one or similar you may like to bring  it with you.
  • Ribbons and gems, and perhaps a little glitter... coloured or white plus a quickie Glue pen if you have one.
  • Also remember your basic tools, PVA glue, D/S tape, scissors, Glue dots, Alcohol free baby wipes etc
  • Embossing powders and pigment inks if you have them, I have used silver and clear sparkly on my sample.
I have kept my design simple as the style of the card is the important thing but I will be using more of the stamps as the week goes on. You can also use coloured printed papers to cover your wallet to give it a bit more pizzazz!

The photos are not the best so I will take more and put them on tomorrow.

Monday, 23 June 2014

Craft Club Challebge - w/c 23rd June 2014

A beautiful Laura Ashley inspired Screen

A new week a new challenge! This week the challenge is to use a beautiful set of Laura Ashley stamps which on first inspection you may over look but as you can see they are a lovely set and give great results.

I have created for this week a screen card which is so pretty and can be displayed in so many different ways and adapted further.  This is another possible 3D card which folds flat for posting, yeyh!!!Not an easy one to photograph so take a look at the pics then I'll tell you what you need:


As you can see I have used an elegant black and white theme which for some reason I just keep going back to but you can add in any colours you like or go for a completely different colour scheme.

You will need to bring to the Craft Club:
  • Plain good weight card stock for the main card which is good for printing onto or you can add panels on to print onto ( you can also use a slightly patterned paper to stamp on as long as it is a simple and not too bold ...some of the dotty papers work well.)
  • Contrasting card to die cut the bird cages and flowers.
  • Gems, ribbons additional accents.
  • You may like to bring some inks with you so you have a larger variety to choose from and you can also bring embossing powders for added interest. (I have printed mine with simple dye based back ink. Make sure your inks are labeled with your name on)
I have all the stamps, dies and tools you need but if you have anything else you might like to try bring it with you. 

I think this card will look totally different when everyone has finished their project and I cant wait to see them all.

Have a great week.


Monday, 16 June 2014

Craft Club Challenge - w/c 16th June 2014

BBQ King/Queen

It's that time of year and the weather has been kind of late and the "summer BBQ's are in full swing so I thought that would make a great theme for a card.  I also recently had a request for a card we have done in the past which was based on a pop up apron and notice board and as most of you have already done this one I thought I would do something slightly different.
 I promised a card for a male but realised I have a females birthday coming up but rest assured my demo for Tuesday will be based on a card for a male and there will also be a quirky pop up apron which I haven't done here!
I have used a new die which the die cuts will be available here for you to purchase as a set but there is another option which I will be demonstrating using dies in our equipment stash.

You will need to bring:
  •  A greeting card blank, the larger the better as this gives you more room to add extra bits on.
  • White card stock
  • Printed paper for the apron/back of the notice board
  • Contrasting card for the square grid on the noticeboard (Black/grey is good)
  • Any waste small dots off peel-off sheets, so take a look in your stash it is a great opportunity to use them up on the notice board.
  • Ribbon/string for the apron and accents.
  • You may want to bring any stamps that are cookery based, also mini envelopes/post cards are good for the board.
  • I have also used a plain coloured piece of card that goes with the striped paper which I have stamped onto.
You can use the theme to create a scrapbook page or as decoration for a recipe book or even a hanging plaque for the Kitchen or even using the apron as labels for jars in the kitchen...loads of uses the choice is yours.

Remember your basic tools and consumables such as PVA glues(essential for this card), d/s tape, sticky dots, inks, emboss powders.

I will be creating more during the week and will post more photos soon. Remember I love to see your finished projects so bring then in and share your ideas.

Tuesday, 10 June 2014

Craft Club Challenge - W/C 10th June 2014

Catch up week!

This is a catch up week with all the stamps and dies etc that we have used over the last 3 weeks so you can choose your project, bring your materials and off you go.  I do have a sneeky peek at a new die purchased and here are a couple of sympathy cards I made (as shown below) and hope this will come into our stash very soon.


I am going to try and tackle adding more photos this afternoon so check back later....assuming the internet doesn't decide to give up!

Happy Crafting

Monday, 2 June 2014

Craft Club Challenge - w/c 2nd June 2014

Oh my...June already! Doesn't time fly when you are having fun! Another wedding event enjoyed on Friday and looking forward to the next event on 9th June.

Our theme for this week is "Time for Tea" and all the goodies that relates to...such as cupcakes, celebration cakes, Tea cups and all things an afternoon tea would offer.  You can create whatever you fancy, a card, a scrapbook page, a fabric cupcake, cupcake accents to go on cushions, tea towels etc....think tea, coffee and cakes.

I will be demonstrating a gate fold card with a variety of themed stamps (with a lovely new corner border and plaque stamp set and stencils but I will also be getting out a fab Sizzix tea cup die which can of course be cut from card or fabric such as felt of stiffened fabric and made into a lovely 3D accent for your home.

The photo below is a sample from a previous demo some years ago but it give you an idea of what can be achieved....and I will add more photos as we progress through the week.
 You will need to decide what you want to achieve and bring the materials with you....if you are doing a card, especially the gate fold you will need an A4 piece of card for your base and a selection of coloured card/paper either plain or printed and perhaps white or cream card for a topper background.  If you want to do other projects you must bring with you what you need.

I will have lots of ideas from magazines and books which I am just checking through now and will up date here if I find something stunning that you need special materials for. This is also a good time to check back at the techniques previously tackled and use those techniques using the cupcake theme.

See you in the week.


Monday, 19 May 2014

Craft Club Challenge - w/c 19th May 2014

Hi All......I'm Back and ready to create!!

After a fantastic 2 week break in Barbados and a most wonderful friends wedding(pic below), I am fully refreshed, albeit a bit jet lagged and ready to start our craft club again from tomorrow.
 It has been a bit of a hectic day as I only arrived home on Sunday and have been clearing the craft studio today as well as doing the chores and washing!  My post here has been a bit delayed as there were 2 things that went wrong since coming back, I managed to break our TV ....a fizz and a puff later ...then no power...oh dear...and our internet connection has been down all day so I was unable to get onto the blog.

Yey, we are now back on line and it is 10pm so this will be a quick post... I have decided to get out some more lovely stamps from the Inkadinkadoo stamp gear range and as my brain is a bit frazzled I will demo some simple stamping effects.

You will need to bring:
  • smooth card to stamp onto, white, cream work well
  • complimentary background paper.
  • Coloured inks (distress or pigment) I also have some here also Archival and Momento black or grey work well.
  • If you have any inkadinkadoo paddles/gears you may want to bring them (make sure they are labelled as yours as well as any inks you bring.
  • Your Base greeting card.
Don't forget I have card etc here if you need it.

See you soon


Monday, 21 April 2014

Craft Club Challenge - W's/C 21st April and 28th April 2014

2 weeks of "Catch Up"

I hope you had a fantastic Easter weekend and are ready to craft! We have done so much since the beginning of the year and for the next 2 weeks we will be catching up with all our unfinished projects, playing with the techniques learned and taking the opportunity to get to grips with some stuff that perhaps you just don't use or perhaps have problems with......so its up to you what you do....just bring with you what you fancy. Take a look at some of the past projects on the blog to remind you  and really have some fun.  You can even look at some of the projects from last year.  The studio is full to bursting with dies, templates, plastic and metal stencils, embossing/creasing boards, rubber stamps plus all the samples I have in the sample box which I will have open and ready for you to have a delve down for some inspiration.

Also just a reminder I am away for 2 weeks from Monday 5th May 2014 and so our next Monday back after that will be 19th May 2014....so check out for the challenge for the week on that day.

I am looking forward to sorting out some of my unfinished projects so see you during the week.

Monday, 14 April 2014

Craft Club Challenge w/c 14th April 2014

Pop up surprise!

As I seem to have misplaced my schedule of demos for the coming weeks, we will be creating a neat little pop up card using a template and so the demo will be for the construction of the card then you will be free to decorate as you wish.

You will need to bring:
  • 2 sheets of A4 cardstock the same colour or an A3 sheet of card stock
  • A complimentary piece of card stock for the pop up mechanism (At least an A4 size)
  • Papers to decorate
  • Accents to decorate
  • You may want to bring some embossing powders, glitters and similar products so that you can really go to town with the decoration. Also this is a great one for stamping a theme so dig out those stamps and have a go! This card doesn't have to be a bag shape, it can just be a card.
I have got card stock here if you need it and I also have some rather lovely printed sheets with cupcakes, ice cream sundaes and cocktail glasses if you wanted to do that theme.


See you in the week. 


Monday, 7 April 2014

Craft Club Challenge - W/C 7th April 2014

Do you see what I see!

This week is all about getting you to use your dies to create the unexpected.  So I want you to bring with you some of your more intricate dies and those that you feel are just a bit limited and we'll do a bit of brainstorming to see what we can come up with.  For those who do not have any dies we have loads here for you to challenge yourselves . Hopefully you'll be surprised at what you see and create.

Bring with you:
  • Some of your dies (also those you haven't used much)
  • Card stock such as white, cream and black and some colours if you wish.
  • If you fancy doing the creative stuff you may want to bring some of your products...eg emboss powders, distress/alcohol inks, guilding flakes, mica powders and sprays to just have a bit of fun with.
  • Small scissors and you ususal glues, tapes and base greeting cards.

Here I have used some dies in a slightly different way....the flowers are created from the ball of wool die and the small oval is from the scissors in the X-Cut Haberdashery die set and the trellis corner is from the Cheery Lynn rectangular trellis...the detail on the dress is created by using the palm leaf from the Marrianne die set LR0192

Hopefully more to follow during the week.


Have a great week.

Make sure you label up your own inks and equipment so you know what is yours as we have had a few bits been mislaid in recent weeks.

Monday, 31 March 2014

Craft Club Challenge - w/c 31st March 2014

Leather & Metal made easy!

This week we will be creating faux leather and distressed metal panels which are great fun to create and can be used for cards or other crafty projects such as book binding, box decorating, framed artwork and decorative hung panels with text on... Such as hearts, clocks etc.


You will need to bring the following with you:
  • Brown parcel paper, brown manilla envelopes or manilla craft paper or card.
  • You will also need a spray bottle if you have one and if you think you may want to do more than one panel you will need to bring Glycerine.
  • If you have any distress inks you may like to bring them so that you don't have to wait if someone is using the inks here (put your initials on your inks so they don't get mixed up)
  • If you have any embossing folders you may want to try them but of course I have lots here.
  • Also bring mirri card, silver or gold is best but try lots of different colours, you can also bring your alcohol inks if you have them.
 ....and one final faux leather piece!
 I look forward to seeing you.